

Hello, everyone. It's been a while since I've been away from pandora, and now things have settled down and now I wish to play again, but, my account seems blocked? perhaps due to inactivity? I posted the same concern on account support forum, but it still seems blocked, so I guess I will make a post on here. any help would be greatly appreciated. Thanks!
This section allows you to view all posts made by this member. Note that you can only see posts made in areas you currently have access to.
Pages1
#2
General Discussion / HELLO ALL :)
December 17, 2012, 12:46:32 AM
Hi, I just want to say how badly I want to play Pandora! But priorities first, right? You just wait, Pandora, I will enjoy the hell out of you once I am done with my work!
Haha, I just came in to share something called
How to pickup a chick in a gym

everyone, have fun! and be happy!
Would love to be back once I'm done with my work. Cya!
Haha, I just came in to share something called
How to pickup a chick in a gym
everyone, have fun! and be happy!
Would love to be back once I'm done with my work. Cya!
#3
Guides / [VIDEO] Milking out a lvl4 treasure map in 6 minutes.
December 07, 2012, 02:14:48 AM
This is a simple video that SHOULD HAVE supplemented the "[HowToGuide #01] How to... Dig up a treasure chest!" on the Guide section. Apologies for not taking the initiative back then when I posted it 
It's a simple video of how I dig up a treasure map in the first place. The interesting portion of the video is however when I try to summon as much as treasure chest guardians at once and take them down fast utilizing the whirlwind ability (as a generic sampire)
I use restock agent for razor, and target the treasure chest to move items from the chest to my loot bag (thus summoning the guardians). Afterwards, I use sell agent to get rid of armor pieces and leather goods to NPC vendors.
Then I Kal Ort Por to my home, use organizer agent to put away gems and reagents to the pre-designated containers. Trash remaining items into the trash bag, and a run for lvl4 tmap is done
As you can see on the top right corner, I kept my checkbook open to show you how much gold I get from doing the run. This time, I got 61k. That's about 10k gold per minute. Including 24 pcoins, not bad, I say.
Uploaded in 720p resolution for your viewing experience. Thank you
WATCH THE VIDEO HERE (YouTube Link)
#4
Guides / [HowToGuide #02] How to... Attack Nearest Enemy via HotKey! (+Video)
December 06, 2012, 10:06:38 PM
Hello, Blindead of SoP here again. Today I want to cover a little bit about using Razor macro to ease your hunting efforts a bit.
Preface
I played UO a long time ago, and when I played, i was a hardcore vanilla user. There was no razor back then, nor was there a market full of easyuo scripts. There was UOAssist, but I really didn't bother with it (if I knew the convenience that such assist programs can provide, I would have definitely used it).
Razor is an amazing tool. Now there are so many aspects of my gameplay that I rely on razor, and i just can't imagine playing without it anymore.
And one of the area (out of sooo many) in game that razor helps me with is battling. and to be quite specific about it, targeting.
Back when i played vanilla style, when I want to attack an enemy, I'd have to first drag up the gump to see the enemy's health, go into war mode, and double click the enemy to start attacking (and quite a lot of times, I'd forget to toggle back into peace mode, and start hacking away at my mount...). And while going on numerous hunting adventures with newer players, I have noticed that many still do this.
How it looks
A simple macro on razor has helped me eliminate such tedious process, so I'd like to share that with you. It's a simple macro that'd attack the nearest enemy by pressing a hotkey.
It looks like this
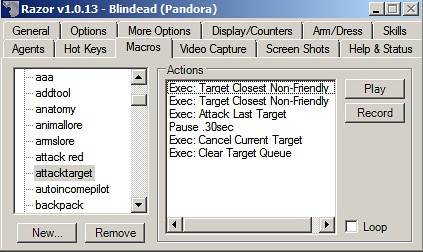
So... How does this work?
Simply, all this macro does is it selects the nearest enemy (grey or red) as the target, and performs attack on them. then it would perform cancel current target and clear target queue to prevent target stacking up or action queuing that hinders player's actions (such as using bandages) when spammed.
So... How do you record this macro?
Simple, oh, so simple.
Step 1. Create a new macro
Step 2. Hit "Record"
Step 3. Go to "HotKey" tab on Razor, find the category called "Targets"
Step 4. Scroll down to "Traget Closest Non-friendly" & hit "Execute Selected"
Step 5. Now, find "Attack Last Target" and also hit "Execute Selected"
Step 6. Find "Cancel Current Target" and hit "Execute Selected"
Step 7. Find "Clear Target Queue" and also hit "Execute Selected"
Step 8. go back to the "Macro" tab, and hit "stop recording"
Step 9. Add 300ms delay below "Exec: attack last target"
DONE! it seems long but it literally takes less than a minute to set up!
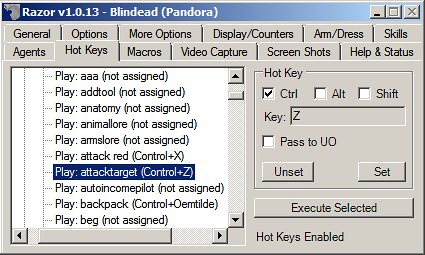
Then assign this macro with a hotkey on keyboard like below. and you are ready to go!
BONUS TIP #1
When you press the hotkey for this macro when you have the target cursor up (eg. When using a skill, like discord), what this macro does is attack the target while using the skill.
It really reduces the need for constant clicking and dragging.
EXAMPLE: USING DISCORDANCE ON MULTIPLE ENEMIES
1. When I am facing a multiple foes, I would first hit a hotkey for discordance, then when the target cursor is up, I'd press the hotkey for this macro to use the skill on the nearest enemy.
X
O ※ X
X
LEGEND:: O=ME X=Enemy ※=Discorded enemy
2. Then I'd flank the enemies, position myself closest to another enemy that isn't discorded, and will perform the exact same method as i just stated.
O
※
※ X
X
LEGEND:: O=ME X=Enemy ※=Discorded enemy
3. And I'd repeat the step above until all my foes are discorded
※ O
※ ※
X
LEGEND:: O=ME X=Enemy ※=Discorded enemy
4. Now all the enemies are discorded and since I "attacked" them, they'd be coming in to surround me. Giving me a perfect opportunity to use Whirlwind and clear these weakened enemies.
※
※ O ※
※
LEGEND:: O=ME X=Enemy ※=Discorded enemy
Above diagram might seem a little confusing. Perhaps I'll try to create a YouTube video for it or smth...
BONUS TIP #2
You can also add another skill or spell or ability into this macro! Take a look at my other macro I use to perform whirlwind on targets!
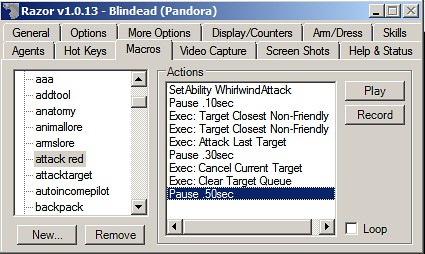
Every time I hit the hotkey for this macro, my character will use Whirlwind (Of course, my character would have a weapon with whirlwind on it), and attack it's nearest foe. Works amazingly well during champ spawns
That's it for now. I hope this can help some players out there in their quest for wealth and glory If you find this tip helpful, please write a comment below, and also, If you have a suggestion or have anything you'd like to know about; tell me on the forums or in-game; and I will do my best to cover them in a later series
EDIT: Here is a simple video of me utilizing all of the tips mentioned up there.
First, kiting around the enemies to discord them, then, using Whirlwind to finish them off. First time with both YouTube and Camtasia, i'll try to make it a bit HD in the future.
WATCH IT HERE ->>> http://www.youtube.com/watch?v=PgqlMRHpP0Q
P.S. Anyone know how to embed youtube videos on forum?
Preface
I played UO a long time ago, and when I played, i was a hardcore vanilla user. There was no razor back then, nor was there a market full of easyuo scripts. There was UOAssist, but I really didn't bother with it (if I knew the convenience that such assist programs can provide, I would have definitely used it).
Razor is an amazing tool. Now there are so many aspects of my gameplay that I rely on razor, and i just can't imagine playing without it anymore.
And one of the area (out of sooo many) in game that razor helps me with is battling. and to be quite specific about it, targeting.
Back when i played vanilla style, when I want to attack an enemy, I'd have to first drag up the gump to see the enemy's health, go into war mode, and double click the enemy to start attacking (and quite a lot of times, I'd forget to toggle back into peace mode, and start hacking away at my mount...). And while going on numerous hunting adventures with newer players, I have noticed that many still do this.
How it looks
A simple macro on razor has helped me eliminate such tedious process, so I'd like to share that with you. It's a simple macro that'd attack the nearest enemy by pressing a hotkey.
It looks like this
So... How does this work?
Simply, all this macro does is it selects the nearest enemy (grey or red) as the target, and performs attack on them. then it would perform cancel current target and clear target queue to prevent target stacking up or action queuing that hinders player's actions (such as using bandages) when spammed.
So... How do you record this macro?
Simple, oh, so simple.
Step 1. Create a new macro
Step 2. Hit "Record"
Step 3. Go to "HotKey" tab on Razor, find the category called "Targets"
Step 4. Scroll down to "Traget Closest Non-friendly" & hit "Execute Selected"
Step 5. Now, find "Attack Last Target" and also hit "Execute Selected"
Step 6. Find "Cancel Current Target" and hit "Execute Selected"
Step 7. Find "Clear Target Queue" and also hit "Execute Selected"
Step 8. go back to the "Macro" tab, and hit "stop recording"
Step 9. Add 300ms delay below "Exec: attack last target"
DONE! it seems long but it literally takes less than a minute to set up!
Then assign this macro with a hotkey on keyboard like below. and you are ready to go!
BONUS TIP #1
When you press the hotkey for this macro when you have the target cursor up (eg. When using a skill, like discord), what this macro does is attack the target while using the skill.
It really reduces the need for constant clicking and dragging.
EXAMPLE: USING DISCORDANCE ON MULTIPLE ENEMIES
1. When I am facing a multiple foes, I would first hit a hotkey for discordance, then when the target cursor is up, I'd press the hotkey for this macro to use the skill on the nearest enemy.
X
O ※ X
X
LEGEND:: O=ME X=Enemy ※=Discorded enemy
2. Then I'd flank the enemies, position myself closest to another enemy that isn't discorded, and will perform the exact same method as i just stated.
O
※
※ X
X
LEGEND:: O=ME X=Enemy ※=Discorded enemy
3. And I'd repeat the step above until all my foes are discorded
※ O
※ ※
X
LEGEND:: O=ME X=Enemy ※=Discorded enemy
4. Now all the enemies are discorded and since I "attacked" them, they'd be coming in to surround me. Giving me a perfect opportunity to use Whirlwind and clear these weakened enemies.
※
※ O ※
※
LEGEND:: O=ME X=Enemy ※=Discorded enemy
Above diagram might seem a little confusing. Perhaps I'll try to create a YouTube video for it or smth...
BONUS TIP #2
You can also add another skill or spell or ability into this macro! Take a look at my other macro I use to perform whirlwind on targets!
Every time I hit the hotkey for this macro, my character will use Whirlwind (Of course, my character would have a weapon with whirlwind on it), and attack it's nearest foe. Works amazingly well during champ spawns
That's it for now. I hope this can help some players out there in their quest for wealth and glory
If you find this tip helpful, please write a comment below, and also, If you have a suggestion or have anything you'd like to know about; tell me on the forums or in-game; and I will do my best to cover them in a later series EDIT: Here is a simple video of me utilizing all of the tips mentioned up there.
First, kiting around the enemies to discord them, then, using Whirlwind to finish them off. First time with both YouTube and Camtasia, i'll try to make it a bit HD in the future.
WATCH IT HERE ->>> http://www.youtube.com/watch?v=PgqlMRHpP0Q
P.S. Anyone know how to embed youtube videos on forum?
#5
Guides / [HowToGuide #01] How to... Dig up a treasure chest!
December 01, 2012, 08:24:22 AM
Hello Pandorians. Blindead of SoP here. Since the shard is currently acting a lil slow atm  , I decided to write a simple guide on doing a treasure map. Yes, it's common sense to quite a lot of us, but I've noticed that some of the newer players have trouble doing them. .So here it goes.
Step 1. Decode the treasure map
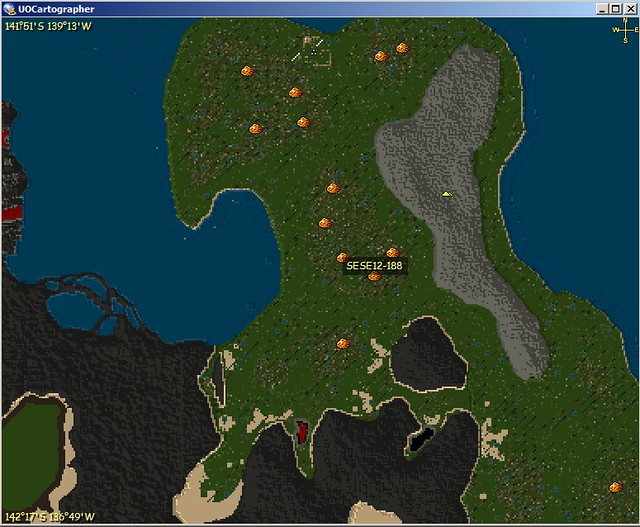
Decoding a treasure map requires cartography, fairly straight forward there. Once you decode the map, the location of the treasure will be displayed as below
Step 2. Match it up in your UO mapping program
Now, try to match up the location shown in game with the treasure spots displayed in your mapping program (UOAM or UOCartographer for example). If you don't have a working mapping program, try the Treasure map archive at UO Stratics.
Now, the location will be labeled with a number like below. Mine, in this case, is 188.
Step 3. Go to the location!
There are several rune libraries that offer runes to each location. I personally find Magg's West Luna Library most useful due to it's master rune book system. Just step on the books, and the book will be activated. Choose the number of the treasure spot, and press "Okay"

You will instantly be transported to the location.

Step 4. DIG!
It seemed like quite a lot of people don't know--or have forgotten--how the digging process works (even Nigel Horns, our guild leader...). NO, you don't dig the ground. Make sure you have a shovel in your backpack. First, click on the decoded map, and click "Dig For Treasure"
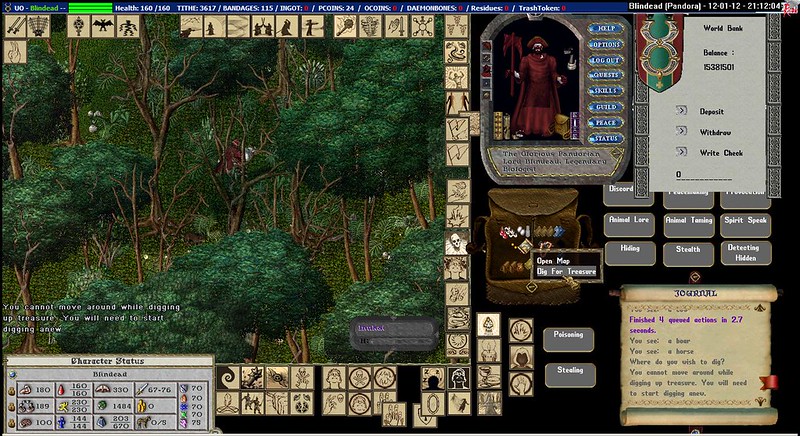
Now, Click on the MAP.

Your treasure chest will rise from the dirt... along with 4 guardians.
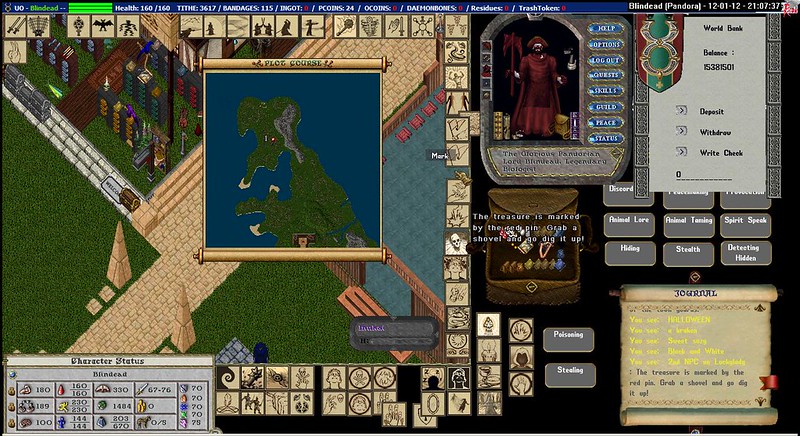
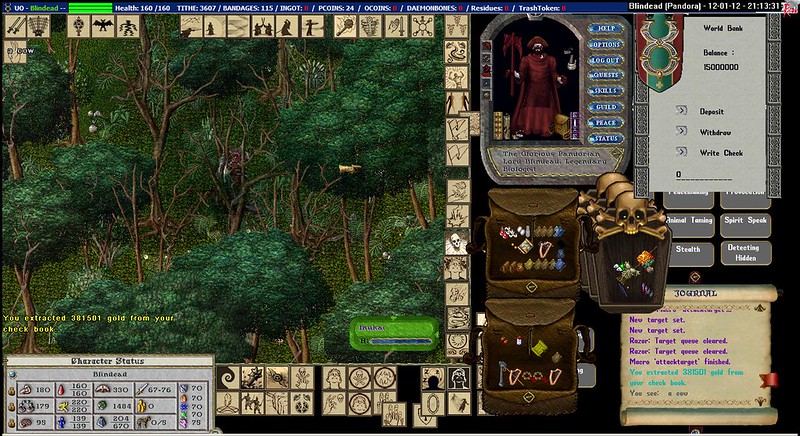
Now, to show you how much you can actually get from a treasure chest, before i looted the first 4 guardians, i've checked out some money from my checkbook to show you how much gold i will be getting by doing the treasure chest.
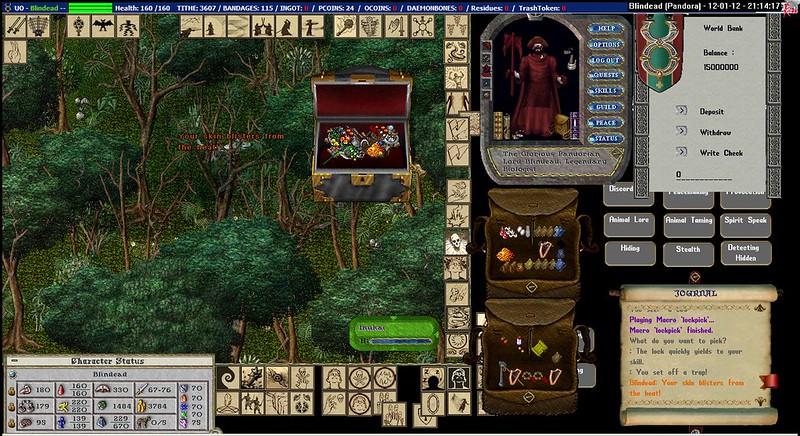
Step 5. Grab the Loot!
After unlocking the treasure chest using lockpick & skill, now it's time to enjoy the sweet treasure inside the chest.
As for the general loot table wise, Each level of the tmap will yield 8k gold and 6 pcoins. So, a level 4 Treasure map (cleverly drawn) will yield 32k and 24 pcoins. There's also a chance that the chest will spawn with a MiB and/or a treasure map one level higher.
...But that's just bare minimum, as you can milk out the treasure chests for guardian spawns. Like I do.
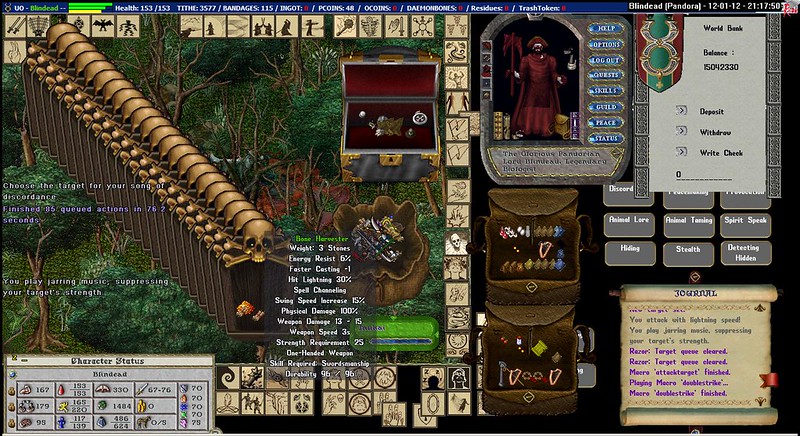
From killing all the guardian spawns, you get quite a bit of gold, some magic items (to unravel... or trash!) and there's also a chance the guardians will drop another treasure map.
Well, from this one run, as you can see on my checkbook, I've gotten 67k gold. Sure, it may not be much to some people, but It's not to shabby for people who can't sweep their way through the Citadel, Bedlam and Twisted Weald.
Although the time stamp says otherwise, I can usually dig down to the bottom of the chest + loot monsters in about 6 minutes. That's quite profitable, I say.
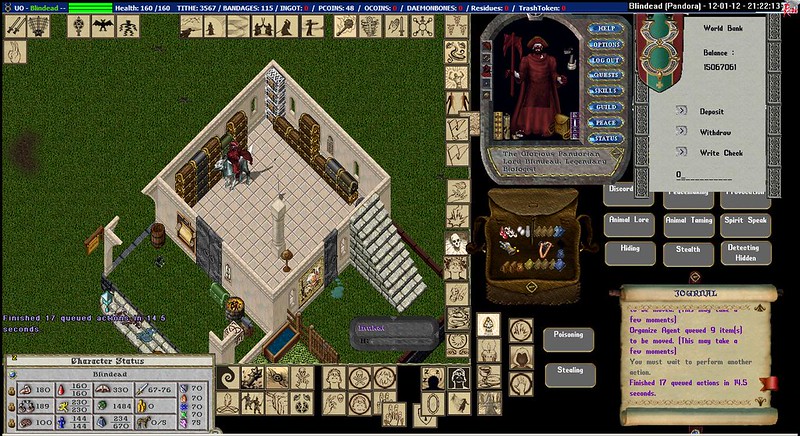
## Basic Etiquette##
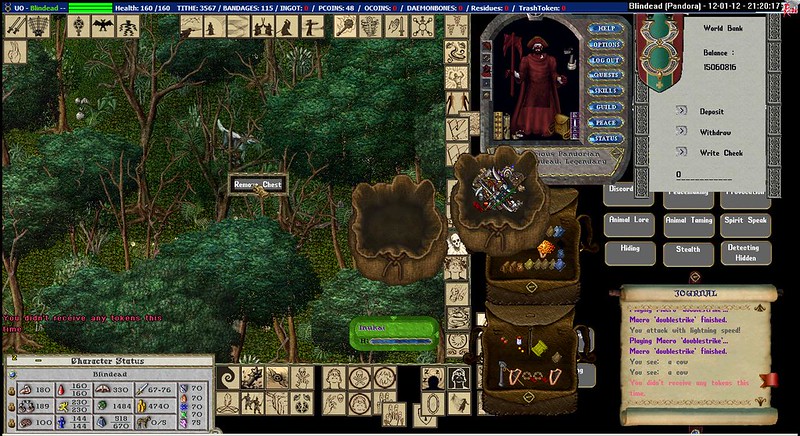
1. Remove the Chest
Always remember to remove the chest when you are done. Only you (the digger) can remove the chest, and you don't want the next person in line to wait two hours till the chest disappears by itself...
Click on the chest, and click "Remove Chest"
2. Clear the spawns!
Sometimes when i teleport to the location, I end up being surrounded by a horde of guardian spawns. Up to level 4, I can handle, but if the spawn was above lvl5+, I don't know how I'd handle against 50 poison + blood elementals at once. you know what they say: "clean up your own $hit."
Hope some people find this useful. That's it. Happy UO.
, I decided to write a simple guide on doing a treasure map. Yes, it's common sense to quite a lot of us, but I've noticed that some of the newer players have trouble doing them. .So here it goes.Step 1. Decode the treasure map
Decoding a treasure map requires cartography, fairly straight forward there. Once you decode the map, the location of the treasure will be displayed as below
Step 2. Match it up in your UO mapping program
Now, try to match up the location shown in game with the treasure spots displayed in your mapping program (UOAM or UOCartographer for example). If you don't have a working mapping program, try the Treasure map archive at UO Stratics.
Now, the location will be labeled with a number like below. Mine, in this case, is 188.
Step 3. Go to the location!
There are several rune libraries that offer runes to each location. I personally find Magg's West Luna Library most useful due to it's master rune book system. Just step on the books, and the book will be activated. Choose the number of the treasure spot, and press "Okay"
You will instantly be transported to the location.
Step 4. DIG!
It seemed like quite a lot of people don't know--or have forgotten--how the digging process works (even Nigel Horns, our guild leader...). NO, you don't dig the ground. Make sure you have a shovel in your backpack. First, click on the decoded map, and click "Dig For Treasure"
Now, Click on the MAP.
Your treasure chest will rise from the dirt... along with 4 guardians.
Now, to show you how much you can actually get from a treasure chest, before i looted the first 4 guardians, i've checked out some money from my checkbook to show you how much gold i will be getting by doing the treasure chest.
Step 5. Grab the Loot!
After unlocking the treasure chest using lockpick & skill, now it's time to enjoy the sweet treasure inside the chest.
As for the general loot table wise, Each level of the tmap will yield 8k gold and 6 pcoins. So, a level 4 Treasure map (cleverly drawn) will yield 32k and 24 pcoins. There's also a chance that the chest will spawn with a MiB and/or a treasure map one level higher.
...But that's just bare minimum, as you can milk out the treasure chests for guardian spawns. Like I do.
From killing all the guardian spawns, you get quite a bit of gold, some magic items (to unravel... or trash!) and there's also a chance the guardians will drop another treasure map.
Well, from this one run, as you can see on my checkbook, I've gotten 67k gold. Sure, it may not be much to some people, but It's not to shabby for people who can't sweep their way through the Citadel, Bedlam and Twisted Weald.
Although the time stamp says otherwise, I can usually dig down to the bottom of the chest + loot monsters in about 6 minutes. That's quite profitable, I say.
## Basic Etiquette##
1. Remove the Chest
Always remember to remove the chest when you are done. Only you (the digger) can remove the chest, and you don't want the next person in line to wait two hours till the chest disappears by itself...
Click on the chest, and click "Remove Chest"
2. Clear the spawns!
Sometimes when i teleport to the location, I end up being surrounded by a horde of guardian spawns. Up to level 4, I can handle, but if the spawn was above lvl5+, I don't know how I'd handle against 50 poison + blood elementals at once. you know what they say: "clean up your own $hit."
Hope some people find this useful. That's it. Happy UO.
#6
Guides / UOAM map files
November 28, 2012, 02:09:23 AM
Well, first of all, to those who are looking for mapping programs. UOAM and UOCartographer cannot "Extract" map files out of UO client anymore, since the whole file system has been changed. Without the old "map00.mul" files, these mapping programs cannot create bitmap maps, and thus you get the "black screen"
My laptop is quite old and have trouble locating the map files for uocart, but here are the bitmap map files for UOAutoMap. Extract the bitmap files into uoam folder, and it should be good to go. It's missing Tokuno, but has maps for britannia, ilshenar and malas. It should do the job when you try to do treasure maps.
http://www.mediafire.com/?dr37l7qovdxapzd
Pages1